I am so super excited about todays post! I haven’t dug in and done a real project in quite awhile (unless painting every room in my house counts!). Finally I dug deep and created a project I am super excited about!
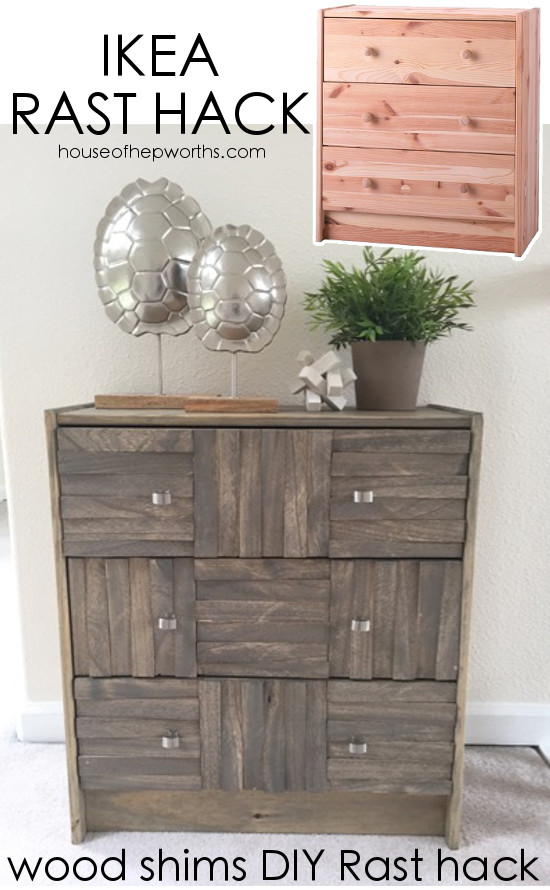
Just when you thought you had seen every single Rast hack on planet earth, I have come up with one that I’ve never seen before! I am smitten with my Rast hack and love it so much I think I’m going to make a 2nd one so I have a pair!

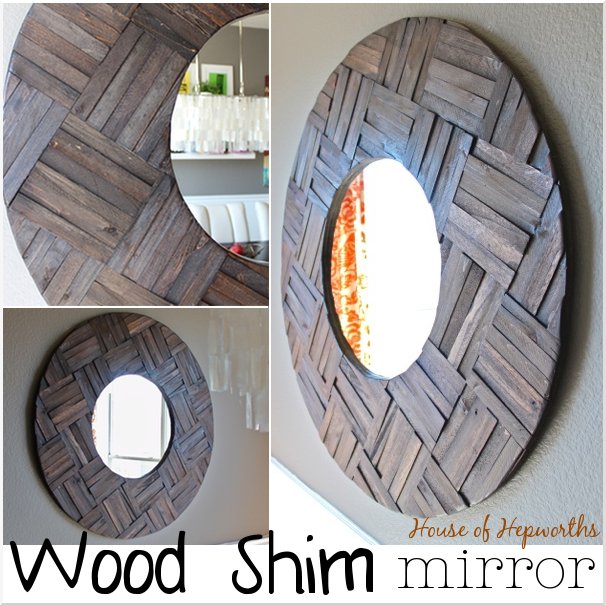
Isn’t it beautiful?! I started with a basic $34.99 IKEA Rast dresser and transformed it into this grid shim weathered oak beauty. I pulled some serious inspiration from this mirror I made many years ago (it’s still one of my all-time favorite projects!) and couldn’t be happier with the outcome.

Before I dive into the step-by-step tutorial, here are a few more shots of this pretty dresser. I tried to take shots from several angles so you can really get a feel for the entire piece.


Are you ready for the step-by-step tutorial so you too can make one of your very own? Here it is!
Supplies Needed: (affiliate links)
IKEA Rast dresser
Minwax Pre-Stain wood conditioner (water based)
Minwax Wood Finish in Weathered Oak 270
Minwax Polycrylic satin finish (water based)
Wood glue
Wood shims
jig saw (this one is my favorite)
bag of rags
disposable foam brushes
drill (this one is my favorite)
6 knobs of your choice (here are the ones I used)
Step 1: Condition
Unpack your new dresser and lay out all the pieces. Using a rag, rub the wood conditioner over every surface of wood. Start with one side first, then when it’s dry flip over and do the other side.

*If you dresser is already assembled adjust this tutorial accordingly.

Step 2: Stain
When your wood pieces are dry, using a fresh rag, stain every piece of wood. As before, allow the top to dry, then flip over and stain the other side.

Step 3: Pick your pattern
When all your pieces are dry, it is now time to add your wood shims.

Lay out your 3 drawer fronts, making sure to line them up face side up. The drawer fronts also have a top and bottom, so make sure they are lined up with their bottoms all facing towards you.
I played around with the patterns of the shims before I settled on my grid pattern. Here are 3 patters I considered:

I decided I liked the tick-tack-toe grid pattern the best. DON’T GLUE THE SHIMS ON YET. This is a dry fitting.

Step 4: Glue your shims
Once your pattern is laid out, now it’s time to glue. I started with the middle section and worked outward to the left and right. Note: the shims will be too long for the drawer front. It’s okay. We will trim them later.

Please note: Stain will not stick to wood glue so be very careful that you do not get any glue on the front of your shims.
Step 5: Trim
Here is the back of the drawer front. You can see that the shims overhang a little:

You will need to use a jig saw and carefully cut away the excess shims.

Follow up with a light sanding along all the edges.
Step 6: Stain
It’s time to stain the drawer fronts. Using a rag, rub your stain over each shim, making sure to get in all the cracks and along the edges. Use enough to soak in, but don’t leave excess on the dresser or it will be sticky or tacky.

During this step I gave each of the other pieces of dresser a 2nd coat of stain.

When the drawer fronts dried I gave them a 2nd coat of stain as well.
Here you can see what the edges look like after trimming and staining:

Step 7: Dry Fit
Dry fit your drawer fronts together and smile at how beautiful they already look. You can tell this is going to be a show stopper!

Also in this step, follow the instructions that came with the dresser and assemble the entire dresser.

Step 8: Top Coat
You are now ready to add your top coat of poly! Carefully remove your drawers.


Using a disposable foam brush carefully and neatly paint your polycrylic onto each of the shims.


Also paint the entire dresser with the polycrylic. Do at least 2 coats. Allow dry time between coats.
Note: You can probably also poly the entire dresser before assembling it.
Step 9: Hardware
At this point I drilled the hardware holes through the shims. I started from inside each drawer and drilled using the predrilled holes in the dresser.

I waited to do this step until the end because I wasn’t sure what hardware I would end up going with. If you know where you want your hardware to go, you can drill the holes before you assemble the drawers.

Here’s the hardware I chose:

I selected something small and basic because I didn’t want it to distract from the texture on the front of the piece of furniture. I felt something bigger or more blingy would take away from the shim pattern.
Step 10: Enjoy!
Insert your drawers back into your dresser. Now take a step back and marvel at your accomplishment!

Even open, the drawers look great. The edges turned out beautifully and look completely finished and polished. The hardware adds a nice subtle accent to the piece.

This is by far one of my favorite ikea hacks I’ve ever done. Heck, it’s one of my overall favorite projects I’ve ever done!


Here is the mirror tutorial I made that I used as inspiration for this IKEA Rast hack:

Thanks for reading! Have a wonderful weekend!


this is so cool!!! Go Allison!
Thanks Jamie. Miss ya! xo
This is awesome! It reminds me of a weathered beach bungalow somewhere on the ocean. Lovely !
Thank you so much. I absolutely love how it turned out.
Really beautiful. Who knew…., wait, I guess you did.
This looks amazing! I have missed your project posts! Glad you are back!
Still using your Shaklee cleaners and loving them…
I still love my Shaklee too! Man, it lasts FOREVER! Glad to be back when I can. My kids are more demanding as teenagers than they ever were as little ones.
Where did you get the turtle shells??? I love them!
Target!
Wow! Very cool! The texture adds a nice “warm, fuzzy” feel to your cool gray space. Well done!
Thanks so much. xo
Really cool! Love the way it turned out, and the placement in you new home! Thanks for sharing your smarts with us. You make everything you do appear do-able.
Because it IS do-able! If I can do it, so can you!
Hey there…we are visiting from Thrifty Decor Chick link party. Your Rast hack stopped us in our tracks…great job! Super creative!
So glad you stopped by!!
I love this so much!! Great idea!!
Wow, your Rast Hack is impressive – definitely in my top 6! Pinned to share
Why use a water based wood conditioner and polycrylic if the stain is oil based? Just curious.